Utility Cabinets 54-in. Wide by 30-in 12-in Deep Family Handyman
How to Build a Home Part
Stock cabinets, a cord organizer, and custom-built tops and shelves go on everything in gild
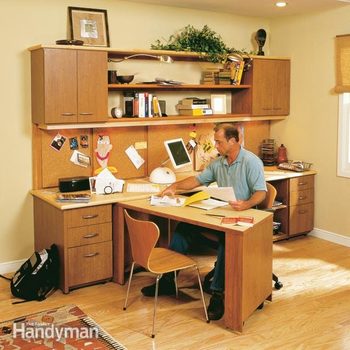
Create a compact dwelling house office center with a desktop and swing-out work area, plenty of drawers and storage, open bookshelves, a big message board and an easy cord organizer.
You might also like: TBD
- Fourth dimension
- Complexity
- Price
- Multiple Days
- Intermediate
- $501-chiliad
Pace 1: Overview

Finished Part Eye
Part center with the swing-out work center tucked away.
Does it seem like you're always shuffling piles of paper trying to find that unpaid electrical bill or your daughter'south soccer schedule? Practise your dining table and kitchen countertops have a permanent layer of paper? Costless up your countertops by building this home role in a guest bedchamber. It fits on any 7-ft. 4-in. to 10-ft. section of wall and however leaves room for the bed. We'll show you how to programme and lay out your office including:
- Buy the right cabinets;
- Club or build the desktops and shelves;
- Build the string trough, bulletin board and swing-out desk;
- Buy the lighting;
- Install everything in 1-ii days.
[Related: Once y'all've built your office, choose the paint that makes the almost sense for yous!]
Figure A: Desk Plan
Guide to Desk-bound Components:
A. Wall cabinets (purchased)
B. File drawer base of operations cabinets (purchased)
C. Storage base chiffonier (purchased)
D. Chiffonier terminate panel (purchased)
East. Desktop (10 ft. ii-1/4 in. 10 25-3/4 in. ten 1 in. thick)
F. Swing-out desk-bound
G. Corkboard
H. Light valance (1×2)
I. Center shelves (6 ft. 1 in. x 12 in. x one in. thick)
J. Peak cap shelf (10 ft. 2-1/4 in. x 16 in. 10 1 in. thick)
Grand. String trough, 10 ft. long
L. Cord trough covers (Photo thirteen; ii at five ft. ane-1/viii in. ten 3 in. 10 1 in. thick. Lucifer countertop E.)
Step 2: Lay Out and Gild the Cabinets
First choose the location for the office and so brand a scaled drawing of the wall you're considering for the desk (Fig. A). Make note of the overall length of the wall, any doors or windows, and the ceiling superlative. Draw horizontal lines at 29 and 54 in. (Photo 1). These stand for the top of the base cabinets and the lesser of the wall cabinets.
Determine the overall length of the desk. Ours is 10 ft., merely it can be shortened to seven ft. four in. past eliminating the base storage cabinet. The desk-bound tin fill a whole wall, sit in the eye of a wall, or start in a corner and stop somewhere along the wall, as shown in our project.
At this signal you demand to talk to a chiffonier supplier and find out the dimensions of its file drawer bases and wall cabinets. Draw these in on your program. Don't get out a span of more than four ft. vi in. between base cabinets or else the desktop volition sag.
As well note the end panel that's necessary to cover the left-hand file cabinet and cord trough. Ours is 29 in. tall (this matches the elevation of the cabinet) and 30 in. deep. Now lodge the cabinets and stop panel. You'll be ordering at least two base cabinets and ii wall cabinets and 1 xxx-in. deep terminate panel. If your desk is longer than 7 ft. four in., as ours is, you'll add together base cabinets. Base units should be 24 in. deep and wall cabinets should exist 12 to xiv in. deep.
Side by side, order or build the desktops and shelves to the dimensions shown on our plans. For strength and to minimize sagging, make them from ane-in. thick particleboard and glue plastic laminate to both faces. Nosotros chose to edge them with a wood bullnose.
Step iii: Build and Install the Cord Trough

Photo ane: Draw level layout lines
Mark out on the wall 2 10-ft. long level lines: i 29 in. and the other 54 in. from the floor. Mark the location of the studs along each line using a stud finder. Preassemble the cord-management trough according to the plan dimensions. Hold it up to the 29-in. horizontal line and bulldoze 3-in. screws into each stud.
Use Figs. B and C to cut and assemble the cord trough. Purchase three ten-ft. pieces of 1×4 No. 2 pine, and cut eight 12-in. ii×4 blocks from a piece of framing lumber.
The cord-management trough is the backbone of the desk. One time it'southward attached to the wall (Photos 1 and 2), the rest of the desk-bound stacks onto it or fastens to the front of it. The top edge of the trough matches the height of the file drawer bases. While ours was set up at 29 in., measure the superlative of your cabinets to ostend.
Cord Trough Construction Details
Build this string trough from 1×4 No. 2 pine and 2×4 structure lumber. Cut out the four-in. dia. semicircle notches with a jigsaw. Apply carpenter'due south glue at all joints and fasten with 2-in. screws.
Step 4: Build and Install the Corkboard

Photograph two: Screw the corkboard frame to the spacer blocks
Mucilage and screw 12-in. 1×iv pine spacer blocks to the wall studs forth the cord trough and just under the 54-in. horizontal line. Position them and so they line upward with the centered mounting screws on the bulletin board frame. Gear up the preassembled corkboard frame onto the trough, and so drive 1-i/2 in. screws into the 1×4 blocks.
The corkboard frame is simply screwed together through the edges of the top and bottom rails (Fig. D). We built ours out of blood-red and finished it to match the cabinets. Stain and end all the sections (corkboard frame, shelf edges, swing-out desk) before installing.
Build the cork inserts past gluing together 2 1/4-in. thick panels (Fig. East), and so fasten the cork sheeting to the face with vinyl flooring agglutinative. Let the cork overhang the wood, and then trim it flush with a utility knife afterward the adhesive dries. Use self-sticking Velcro tape to concur the panels to the frame. Considering the frame is held abroad from the wall, it's easy to run electrical cords backside it.
Corkboard Frame and Panel Construction Details
Corkboard Frame:
Make the corkboard frame from 3/4-in. x two-in. boards. With a miter box, square-cut the vertical pieces to fit between the superlative and bottom rails. Drill clearance holes and drive two iii-in. screws at each articulation. Utilise carpenter'south glue to the 1-in. ten 1-1/two in. cease cap and clamp to the frame until the glue sets.
Cork Console Insert:
Cut 2 1/4-in. thick panels, one 20-vii/8 in. x 21-1/two in., the other 21-seven/viii in. x 22-1/two in. Spread a thin layer of carpenter's mucilage on the face of the smaller piece. Center the 2 pieces face to face up and lay a toolbox or some other weight on peak until the glue sets. Adjacent, glue the sheet of cork to the front face of the console.
Step 5: Install the Upper Cabinets and Shelves

Photo 3: Fasten the upper cabinets
Prepare the left upper cabinet onto the corkboard frame. Hold information technology flush with the end of the frame. Fasten with a minimum of three ii-1/2 in. screws driven through the cabinet back into studs. Next, install the correct upper cabinet. Describe a level line to mark the shelf cleats.

Photo iv: Mark shelf locations
Mark the location of the shelves on the side of both upper cabinets. Apply a carpenter's square to ensure the shelves are level front end to back.

Photo 5: Fasten the shelf cleats
Install the two shelf-back up cleats along the horizontal layout lines. Drill clearance holes and drive a 2-1/two in. screw at each stud.

Photograph six: Install the lower shelf
Set the lower shelf on the corkboard frame, holding the front border flush with the lesser of the cabinet. So drive three two-in. screws to fasten information technology in place. Install the middle shelf the same way.

Photo 7: Screw the calorie-free valance to the shelf
Clamp the 3/4 x 1-1/2 in. calorie-free valance to the cabinets and shelf. Hold information technology 1-i/ii in. back from the chiffonier fronts. Drill clearance and countersink holes every 2 ft., then bulldoze two-in. screws into the cabinets and the lower shelf to secure it. Countersink screwheads slightly and then embrace them with self-adhering caps. Caps are bachelor in a diversity of colors and woods finishes.
Ready the wall cabinets onto the corkboard frame (Photograph three). Flush the left-manus cabinet to the end of the corkboard frame. Adjust the right-paw chiffonier into the corner to make the space between the cabinets conform to the length of the shelves. The corner chiffonier tin can sit down a bit away from the side wall.
Drive screws through the cabinet backs into studs. The screws should be long enough to penetrate 1-ane/2 in. into the studs.
Mark the shelf cleat locations (Photo iii) on the wall. Continue these lines onto the chiffonier sides (Photograph four). Use a carpenter'south square to make sure these lines are also level. Drill clearance holes and spiral the 1×2 shelf cleats to each stud with 2-1/2 in. screws (Photo 5).
Depict a layout line on the inside of the cabinet. Brand sure it follows the center of the shelf. Drill clearance holes, hold the shelf in place and drive three 2-in. screws to spike the two shelves (Photo 6).
Miter-cut the two iii/4-in. x 1-1/2 in. calorie-free valance pieces, and and so clamp them 1-one/2 in. back from the forepart and side of the cabinets.
Drill clearance holes (Photo seven) through the edge of the light valance spaced 2 ft. apart. Bulldoze ii-in. screws, making sure to countersink the screwheads.
Lay the cap shelf on the cabinets and fasten with screws driven from inside the cabinets.
Stride vi: Install Base Cabinets and Countertop

Photograph 8: Level the outset base cabinet
Button the left drawer base chiffonier into place flush with the end of the cord trough. Adjust the feet to level information technology with the trough. Drive two 1-1/ii in. screws through the dorsum into the trough.

Close-up
Adjustable foot

Photograph 9: Place the remaining base of operations cabinets
Clamp the cabinets together, pre-drill and countersink screw holes, and bulldoze iii ane-ane/4 in. screws. Push the cabinets into position, level with the cord trough and fasten with one-ane/2 in. screws.

Photograph x: Notch the end console
Mark out a square notch on the end console to fit around the baseboard. Cut out with a jigsaw. Record off the panel to prevent scratches in the finish.
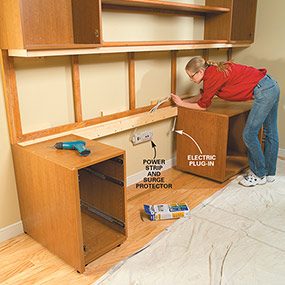
Photo 11: Install the surge protector
Spiral the surge protector to the wall beneath the trough. Feed the power cord through the trough and to the electrical outlet.
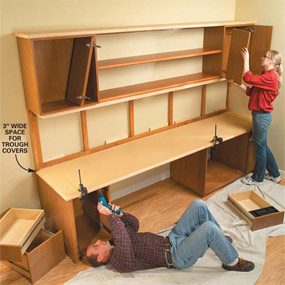
Photo 12: Attach the desktop
Position the top onto the base cabinets so that the back edge overlaps 3/8 in. onto the cord trough. Make sure the trough covers fit. Conform the top'due south position if necessary. Clench and spike the pinnacle with screws driven from within the cabinets. Measure the thickness of the cabinet's summit plus the desktop to brand certain the screws aren't too long. Reassemble the doors and drawers.

Photo 13: Cover the cord trough
Set the cord-trough covers in place. Utilise a 3-in. piece of self-sticking Velcro record to the four edges of each cork console. Utilize the mating Velcro to the frame and fix the panels in place.
Set the left base cabinet flush with the end of the cord trough. Accommodate the feet or shim nether the cabinet to level it and make information technology flush with the trough (Photo 8). Footed cabinets are ideal if your flooring is carpeted. Drive two screws through the chiffonier back into the trough.
Clench the two correct-side cabinets together, then bulldoze ane-1/four in. screws to make a tight articulation (Photo nine). Push the cabinets into the corner and confronting the baseboard; fasten to the cord trough with several 1-1/2 in. screws.
Cut a square notch in the end panel to clear the baseboard (Photo x). Fasten this panel with screws driven from inside the cabinet.
Buy a power strip with surge protection and mount it to the wall below the string trough (Photograph 11). All your equipment and lights plug into this strip.
Set the top and the trough covers in place on the base cabinets. Go out a small gap between the trough covers and the corkboard frame then the covers don't go jammed in and become difficult to lift out. Clench the superlative to the cabinets, remove the trough covers, then fasten with screws driven from inside the cabinets (Photograph 12). Be sure the screws aren't too long or else you'll have a pigsty in your desktop. Set the string-trough covers in identify (Photo xiii).
Step 7: Build the Swing-Out Desk
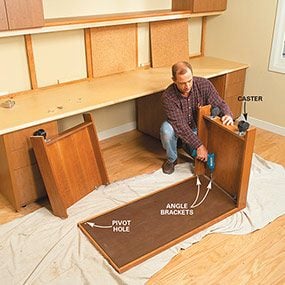
Photo 14: Assemble the swing-out desk-bound legs and top
Preassemble the desk legs, then spiral the casters to them with iii/4-in. No. 10 pan head screws. Fasten the legs to the meridian using small angle fasteners and 3/four-in. screws. Position and drill the 1/2-in. pin pigsty.

Photograph 15: Install the T-nut
Mark the position of the special T-nut on the underside of the desktop. Drill a 1/2-in. diameter pilot pigsty 3/4 in. deep and and so spike the T-nut in place with the provided screws.

Photograph 16: Attach the swing-out desk
Coil the swing-out top into position, push the sleeve and bolt through the pin pigsty and screw into the T-nut. Tighten snugly with pliers or a wrench.
Post-obit the cartoon (Fig. F), cutting the pieces for the swing-out desk legs. A table saw is a must to make the askew cuts, and so if necessary, have a cabinetmaker practise this for y'all. Use carpenter's glue and clamps to get together the legs. Attach them to the desktop (Photo 14) using 1-1/2 in. bending irons. Lay out the pivot hole and drill a i/2-in. pigsty all the way through the elevation. Locate and install the T-nut (Photo 15). Curlicue the top into position (Photograph 16) and then slide the sleeve, commodities and washer through the pin hole. Thread and tighten firmly with a wrench.
Swing-out desktop structure details
Follow the dimensions to cut the pieces on a tabular array saw. Use solid lumber for pieces A, B, C and D and veneered sheet stock for the two panels E and F. First fasten the front and dorsum pieces to the panel with forest gum and clamps. Next, fit, glue and clench the bottom strip.
A. 3/four in. 10 5-1/ii in. x 27-1/2 in.
B. 3/4 in. x 5-i/two in. x 27-one/2 in. with 24-caste bevel on one long edge
C. 3/4 in. x 3-1/two in. x 20 in.
D. 3/4 in. x 3-one/2 in. x 21-3/eight in. with 24-degree end cuts
E. 3/4 in. x 20 in. wide x 24-1/8 in. tall
F. 3/4 in. x 21-3/viii in. wide ten 24-1/8 in. tall with 24-caste side cuts
G. Laminated superlative; run across "Top View"
Stride 8: Lighting Is the Finishing Affect
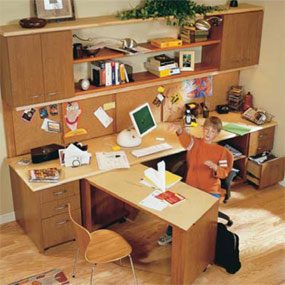
Finished
A hard-working desk
Line voltage halogen puck lights are platonic for this desk. They come with a string and plug that you simply route behind the corkboard to the trough. We bought a ready of five and spaced them under the wall cabinets and shelves. We splurged on a couple of imported swing-arm light fixtures. These but screwed to the side of our cabinets, and the cords were routed through the cabinet and backside the corkboard to the ability supply.
Required Tools for this Project
Have the necessary tools for this DIY projection lined up before you start—y'all'll save time and frustration.
Required Materials for this Project
Avert concluding-minute shopping trips by having all your materials ready ahead of time. Hither's a list.
cawthorneglact1947.blogspot.com
Source: https://www.familyhandyman.com/project/how-to-build-a-home-office/
0 Response to "Utility Cabinets 54-in. Wide by 30-in 12-in Deep Family Handyman"
Post a Comment