How to Move Your Itunes Account to a New Computer
Bill has been an information systems professional for more than 30 years. He enjoys writing about cooking, local history, and technology.
I bought a new laptop that had Windows 10 installed and spent a day and a half transferring programs, photos, etc., from my old laptop to my new laptop. The last task was to transfer my iTunes music, something I expected to be rather straight forward. This turned out to be a daunting task, not because the process is difficult, but because most of the online how-to articles grossly over-complicate the issue. This method will preserve all of your play counts, ratings, and playlists.
Notes:
- These instructions are for moving iTunes libraries from Windows (98, 2000, XP, 7) to Windows 10.
- If you are moving between Mac and PC, these instructions aren't for you. Some very good videos on that subject can be found on YouTube.
- The instructions may seem long and complicated, but that's because I've tried to detail every step so that a complete computer novice could do it. If you have more advanced computer skills, here is an overview of the steps:
- Use iTunes to consolidate the media files.
- Copy the iTunes folder to the new computer.
- Edit the "iTunes Music Library.xml" file to reflect the new file locations. (Windows10 uses a different folder hierarchy than some previous versions).
- Import the XML file.
Use an External Storage Device
An external storage device is the easiest and fastest way to transfer the files between two PCs. I bought a 1-terabyte (1000 gigabyte) external drive for less than $100. It made transferring many gigabytes of photos from the old PC to the new one really easy, plus it serves as a back-up for all of my media files (photos, music, movies, etc.). Alternatively, you can use an inexpensive USB drive for this. You may have to copy your files in batches if they don't all fit in one move.
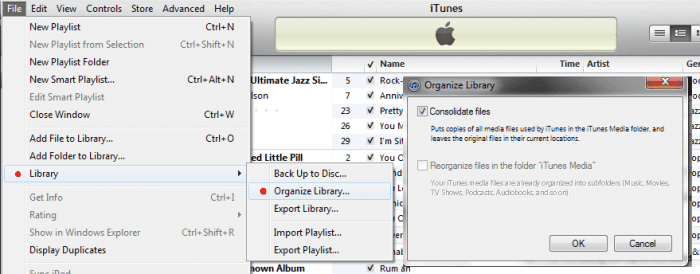
Consolidate your files in iTunes. (Click to enlarge)
Consolidate Your iTunes Files
Your iTunes files may not all be stored in the same place if you imported music from CDs, other iTunes libraries, and the iTunes store. To make the transfer easier, we will use iTunes to consolidate all of the files into a single place. This will not move the files from their original locations, but it will make new copies as necessary. If your old PC is running low on disk space, you may be prompted that there is not enough room to continue the operation. In that case you'll need to free-up some space and try again.
On your old PC:
- Start iTunes
- File/Library/Organize/Consolidate
Note: If you are managing multiple iTunes libraries on one PC, then perform these steps for each library. If you don't know if you have multiple iTunes libraries then you only have one and don't need to be concerned. Managing multiple libraries in iTunes is something an advanced user might do, as there is no direct way to do it within the iTunes software.
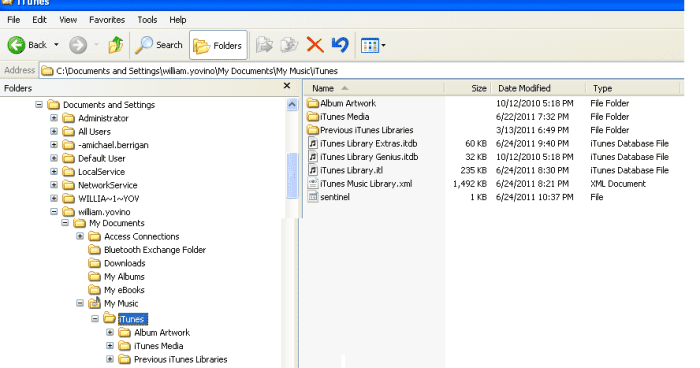
Locate the iTunes media folder on your old PC. (Click to enlarge)
Create an XML File From Your Library
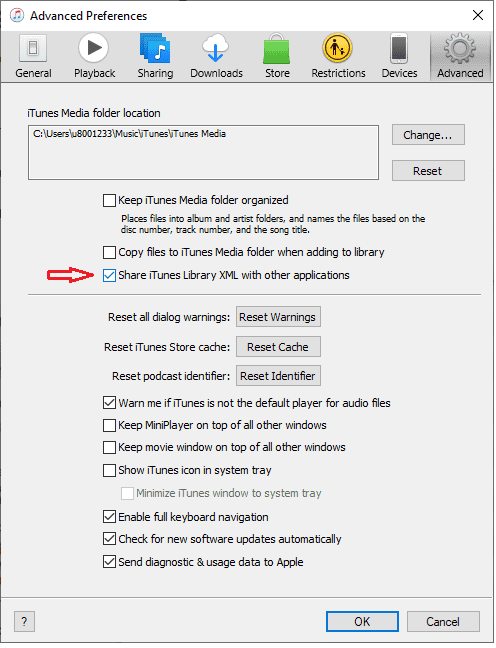
Newer versions of iTunes no longer automatically create the XML file. If you look at the above screenshot you'll see a file called "iTunes Music Library.xml". If it doesn't exist in your iTunes Media folder, you'll need to create it. In the iTunes menu select "Edit", then Preferences", then click on the "Advanced" tab.
Check the box that says "Share iTunes Library XML with other applications", then click "OK". The XML file will be created in the folder shown at the top of the screen.
Copy the Files to the External Drive
Once you have consolidated the iTunes files, close the iTunes program and start Windows File Explorer. (Right-click the Start button and select "File Explorer".)
Navigate to the iTunes media folder. This is the folder that holds all of the music and album artwork, not the folder that holds the iTunes program. If you have a standard iTunes installation, the media folder will depend on which version of WIndows you have.
If your old computer's Windows is earlier than Windows 7, the media folder will be under "Documents and Settings\(your login name)\My Documents\My Music\iTunes".
If your old computer is running Windows 7 or older, the media folder will be under "Users\(your login name)\Music\iTunes".
In my case, the iTunes media folder on my Windows 2000 computer was:
C:\Documents and Settings\William.Yovino\My Documents\My Music\iTunes
Copy the iTunes folder to the external hard-drive:
- Right-click "iTunes", select "Copy".
- Navigate to the external hard-drive.
- Right-click the external hard-drive's name, select "Paste".
- You will see the progress of the copy operation. It can take five minutes or more depending on how large your iTunes library is. Once the copy operation has completed, you can disconnect the external hard-drive.
- It's a good idea to de-authorize your old computer so that it doesn't take up one of the five slots allotted by iTunes for sharing files. From the Account menu, select Authorizations, then Deauthorize This Computer. If your iTunes version is very old, from the Store menu, choose Deauthorize This Computer. (See http://support.apple.com/kb/HT1420 for more information on Authorizing and De-authorizing.)
On to the New PC
The next steps assume that your new PC is properly set-up and connected to the Internet. If iTunes has not yet been installed, go to http://www.apple.com/iTunes/Download/ to download and install iTunes on your new computer.
Shut down the iTunes program if it is running.
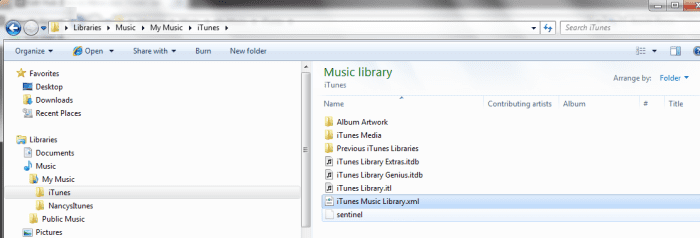
Edit the file "iTunes Music Library.xml" (Click to enlarge)
Examine Your New iTunes Environment
We need to find out where iTunes expects to find its files on the new PC. Later we will edit a file and use the information we learned during this step.
Add one song to iTunes (any song will do): File / Add file to Library.
- Start Windows File Explorer (right-click the Windows icon on the bottom task-bar and select "File Explorer").
- Under "This PC", click on "Music", then open the iTunes folder.
- Right-click the file called "iTunes Music Library.xml" and select "Edit". (If the file isn't there, create one by following the steps shown above in "Create an XML File From Your Library".)
- Look for the line that says "File://localhost/".
- Select the text from "C:/" to "iTunes/" In my case, I copied "C:/Users/Bill%20Yovino/Music/iTunes/".
- Copy the selection (hold down the Ctrl-key and press the letter "C").
- Close the edit window without saving.
- Open up Notepad and paste the selected text by holding down the Ctrl-key and pressing the letter "V". You will use this information in the next step.
Copy the Files to Your New PC
- Navigate to Libraries/Music/My Music/iTunes.
- Right-click the iTunes folder and select "Delete".
- Attach the external hard-drive to your new PC.
- Navigate to the iTunes folder (from the old PC) on the external hard-drive.
- Right-click the folder and select "Copy".
- Scroll up and navigate to the "Libraries / Music / My Music" folder.
- Right-click the "My Music" folder and select "Paste". You will see the progress of the copy operation. It will take five minutes or more depending on the size of your iTunes library.
- Important Note: Move the XML file to a different folder otherwise iTunes will delete it when you start it. (Thank you iTunes for continually changing things)
Finishing the Move
The last step is to edit the "iTunes Music Library.xml" file to reflect the proper location.
- Use Windows Explorer to navigate to the XML file that you copied from your old computer in the step above.
- Right-click the file "iTunes Music Library.xml" and select "Edit".
- Find the "File://localhost/" text as we did earlier.
- Select the file location beginning at the "C:/" and ending at the "iTunes/". In my case it was "C:/Documents%20and%20Settings/william.yovino/My%20Documents/My%20Music/iTunes/".
- Copy the text by holding down the Ctrl-key and pressing "C".
- From the Notepad menu, click "Edit" then "Replace".
- Paste the text into the "Find What" field by holding down Ctrl-key and pressing "V" (This is the text from the old PC that you just copied).
- In the "Replace with" field enter the text that we saved earlier. (This is the text from the new PC that you noted in the previous step).
- Click "Replace All". It will take several seconds to replace all of the occurrences. In my case, I replaced C:/Documents%20and%20Settings/william.yovino/My%20Documents/My%20Music/iTunes with C:/Users/Bill%20Yovino/Music/iTunes
- Close the Notepad session and save the results.
- Start iTunes. Select "File/Library/Import Playlist". Navigate to the XML file that you edited, select it and click "OK". The songs should now appear in iTunes. If not, recheck that you entered the correct information during the Find/Replace step.
This article is accurate and true to the best of the author's knowledge. Content is for informational or entertainment purposes only and does not substitute for personal counsel or professional advice in business, financial, legal, or technical matters.
© 2011 Bill Yovino
Bill Yovino (author) on June 06, 2020:
Hi NIck, It's referring to the XML File from the old PC, which is likely in the iTunes folder that you're copying over to the new PC. If you leave it in the iTunes folder when you copy the music to the new PC, iTunes will delete it when it starts. You can put it anywhere else and will use it during the "Finishing The Move" part above.
Nick99 on June 06, 2020:
Thank you for the detailed advice! i haven't tried this yet but I'm planning to.
You say "Important Note: Move the XML file to a different folder otherwise iTunes will delete it when you start it. (Thank you iTunes for continually changing things)."
Is the XML file you refer to here the one on the new PC or the XML file from the old PC that is being copied?
If it's the XML file from the old PC, should it be copied separately from the iTunes folder?
If it's the XML file created by iTunes on the new PC, should it be deleted once the new file location has been copied?
Thanks again!
Bill Yovino (author) on December 29, 2019:
@AndreaB12. I'm glad you got it working and thanks for the feedback. You could change the filenames to make them shorter, but that would be pretty tedious in your case, unless you built a script to do them all programatically. iTunes gets the song title and other information from the file properties. Right-click the file and select Properties, and then the Details tab to view or edit them. You probably know that but I'm putting it here for reference.
AndreaB12 on December 28, 2019:
Thanks for your great tips. I have just completed the same process you went through transfering my large music collection to a new laptop. I had problems years before when I lost a disk and lost all my metadata in spite of trying everything I could think of, including editing the xml. I have a good working knowledge of databases and structures and I thought I would be able to master it, but itunes is a law unto itself!
Anyway, importing the whole library in one go didn't work. I had two problems. One was my new media destination path was slightly longer than the old one and it made some of the paths of some tracks too long for windows.
My collection is almost all classical music and you sometimes get track names like Beethoven: Symphony #9 In D Minor, Op. 125, "Choral" - 1. Allegro Ma Non Troppo. Violetta Urmana, Karita Mattila, Etc.; Claudio Abbado: Berlin Philharmonic Orchestra, Swedish Radio Choir, Eric Ericson Choir (!)
Another issue was that I normally buy and rip CDs but sometimes buy from itunes. The new version of itunes on my laptop wanted to re-download all of these and lose my play counts etc.
I got around this by creating a playlist on my old pc of all of these tracks. Signing out of itunes store on my laptop and then importing this library separately. This mostly worked.
So I had to start again and I decided to keep the media file at a higher level - i.e. c:\music. It's not ideal but it prevents problems with pathnames.
I moved all the music to the new folder and then built playlists of up to 100 albums each on my old PC to import the library in parts.
It took me most of today, but it's all there now. One extra problem was that itunes lost a lot of my album artwork for some reason so I have had to find and re-attach that.
in all I lost the play counts from two tracks out of over 15,000. I call that success!!
Thanks again for your detailed advice!!
Bill Yovino (author) on November 18, 2016:
Are you sure you're saving the changes after the search and replace step?
pip-pip on November 17, 2016:
Bill, when I do this and then open iTunes, it just replaces my edited xml path with the original path, ie the one from the old computer. How do I stop it from doing that?
Bill Yovino (author) on October 22, 2016:
Hi Graves6188. You can use a USB drive, sometimes called a "Thumb Drive". You can get them almost anywhere and they are very cheap. I've seen 8 gb USB drives for five or ten dollars.
graves6188 on October 22, 2016:
Hi Bill, Is there any way to do the transfer without using an external hard drive? And yes, I am a true novice :)
FrankieLloyd on October 22, 2015:
Bill,
Thank you - awesome tutorial!
Regarding what you mentioned on Easy Transfer (which is no longer available on Windows 10) - I've found another tutorial here that shows how to do an automatic transfer using some sort of Easy transfer replacement:
http://www.zinstall.com/how-to/how-to-transfer-itu...
Successfully transferred iTunes, music and a bunch of other programs.
Hope this helps!
Ollswell on July 28, 2015:
A lot of good advice, I would only add that you should try running the app Song Sergeant to see if you still have any remaining missing/duplicated/etc problems after moving your library. It's free if all you're doing is looking for problems.
Bill Yovino (author) on August 27, 2014:
Thanks, Lisa. I love hearing success stories.
Lisa on August 24, 2014:
Thank you so much!!! This made my transfer of my iTunes library from Windows XP to Windows 8.1 so easy and stress free! I really appreciated this post and the detailed step by step instructions. Just what I needed :)
Holly on March 25, 2014:
Hi Bill - This process has saved me much heartache and aggravation! Thanks for posting. However - I was still left with duplicates (sometimes triplicates) in my iTunes library. I guess I thought the consolidation step would get rid of duplicates? Anyway - it's not the end of the world and I've started the process of manually deleting the duplicates from my library. But if there's an easier method or anything else I should know - please share.
Bill Yovino (author) on February 10, 2014:
Hi Tony. Yes, this method preserves all of the statistics. Good luck
Tony on February 09, 2014:
I just bought a new PC with windows 7. My old system had windows XP. Your instructions are well laid out and very clear. Thank you for that. I will be using your method soon. Question though.... did your method preserve all the star ratings, # of plays, last played, etc?
Bill Yovino (author) on February 03, 2014:
Glad it worked out for you and thanks for letting me know!
Nass on February 02, 2014:
Thank you so much for resolving my massive problem! You are a hero.
Bill Yovino (author) on September 28, 2013:
Mick W. thanks for taking the time to leave a comment. I love hearing success stories.
Mick W. on September 28, 2013:
Bill, you are a star. I've just moved 3 user libraries from XP to Windows 8. All of my ratings on 3,800 tracks were still were there, which makes my playlists work......brilliant. Now I just have to work out why iTunes has included some MP3 tracks that I created for a phone, giving me duplicates, albeit that one is .m4a and the other is .mp3.....Thanks again.
Glenn Stok from Long Island, NY on August 10, 2013:
I had recently moved everything from a PC to a Mac. Apple has not made it easy to propagate an iTunes library from one computer to another, let alone among differing operating systems.
Your instructions are very useful for anyone who wants to preserve the entire iTunes configuration. Even taking into account the issues with Windows 7's different folder hierarchy.
Bill Yovino (author) on February 10, 2013:
Thanks for sharing. It makes me happy to hear success stories.
Cathy L. on February 10, 2013:
Bill, Thank you, Thank you, Thank you for your helpful article. I was moving from my laptop win 7 to a desktop win 7 . I had a second drive in my laptop that had my itunes library on it and I put that drive into the desktop. I only used windows easy transfer for my c drive. After installing windows and iTunes on my new system, I used the WET program to put the stuff from my laptop onto the new system. Since the new system had a different name than the old one, I only had to edit the xml file to change the name part of the string. It worked like a charm. I have had problems over the past year with my laptop and have had to reinstall windows several times and always having to redo my itunes library. What a pain. This was the easiest part of the whole transfer. Thank you again for the great article.
Bill Yovino (author) on February 03, 2013:
Love to hear that!
Shane on February 03, 2013:
This worked for me too! Thanks for your post!
Bill Yovino (author) on January 30, 2013:
Glad to hear about your success, and thank you for the feedback!
Peggy L. on January 29, 2013:
It worked!!!!! Thank you! Thank you! Thank you! I have been trying to get my library transferred to my new laptop for a year now and just got more and more frustrated every time. This worked and I am so happy. I now have music on my ipod for my workout. I have no excuses now. I cannot thank you enough!
Bill Yovino (author) on November 23, 2012:
Hello Guy. Did you do the consolidation step on your old PC first? If not, you may be missing files when you made the copy. Make sure you copy the music files to the correct folder and edit the XML as appropriate. The %20 is just how the computer represents a space. so "Help Me" would be "Help%20Me".
You need to change the song path in the XML to reflect the new file location, which is different than your old PC.
If you're really stumped and want to start again, reinstall iTunes on your new computer, then go to the iTunes store and download a song. Then examine the XML file or use Windows Explorer to see where iTunes is storing the music files. That's where you need to copy your old music.
Guy Norton on November 20, 2012:
I recently overwitten all my itunes playlists whilst uploading to a new PC. I have my original itunes library still intact on my old PC.
I have copied the old library xml file over to the new machine but all I get are exclamation marks.
My old PC my music was stored under itunes/itunes Music but on the new machine they are on itunes/itunes Media/itunes Music which is different. I have tried what you've suggested above and I have still yet to get rid of the exclamation points
I don't really have any understanding of what the coding is in the xml files as the song paths aren't the same as listed folders above. Most of it makes sense but the added coding of the %20 is a mystery.
Are you able to help?
Bill Yovino (author) on July 18, 2012:
@Chris - thanks for the info!
Chris on July 18, 2012:
Yup you can - but only once per year so it's worth not forgetting to preserve valuable slots! Good article, thanks.
Bill Yovino (author) on July 15, 2012:
If you run out of slots you can always deactivate all of the computers via iTunes then re-add the appropriate ones. I've added a note about deactivating the old computer above.
http://support.apple.com/kb/HT1420
Chris on July 15, 2012:
No, you can't modify the list - you can only deauthorise a computer from that computer. So before you trash the old installation you should deauthorise it or you've lost your opportunity. Since you get 5 slots the worst that will happen is you've wasted a slot and now effectively have 4 slots available including the new computer. That may or may not present a problem depending on how you use your authorised slots.
Bill Yovino (author) on July 14, 2012:
Good point, but like you said, you can always modify your list of active computers. Sounds like a good idea for another article!
Chris on July 14, 2012:
Thanks, I will try this. You should also mention that it's a good idea to deauthorise the old computer before binning it, and then authorising the new computer once your steps are complete. If you forget it's no big deal but you'll be wasting one of your 5 authorised computers slots.
Bill Yovino (author) on February 06, 2012:
Glad you found it helpful and thanks for the feedback.
Dave on February 06, 2012:
Thank you sir for the very detailed instructions! Your's were the first I found that went in the XML changes, something I discovered while looking at the files before finding your artcile. You confirmed what I was thinking and everything was completed successfully. I now have 3 happy iTune'rs in my house... :-)
Bill Yovino (author) on December 06, 2011:
Interesting question. I haven't tried it but it would probably work.
Angela Goodwin from Southern California on December 06, 2011:
Great information! Just a thought though, is it possible to operate itunes within the external drive? If so it would be a huge help as I have an extensive library and need to free up some space on the laptop.
Bill Yovino (author) on September 17, 2011:
@Peter - I've added a note above about trying Windows Easy Transfer first. Thanks for the comment.
Bill Yovino (author) on September 17, 2011:
That's great! I tried the "Windows easy transfer" a few times but it didn't work for me. It ran for hours but didn't actually do anything. I think it depends on how your old PC is set up(content, privileges, anti-virus software, etc.), so it's hit or miss. I'm fairly happy with Windows 7, especially when it comes to setting up networking and printers, but I wish it would stop trying to "help" me by assuming what I'm trying to do and stepping in where it's not wanted. Glad the transition went smoothly for you.
Peter Davies on September 17, 2011:
I have acquired a new computer with Windows 7. (the old one was XP).
I left the transfer of itunes to the end because my Google searches suggested it was complicated.
Having read your clear instructions my first step was to download the itunes software to the new computer. To my surprise when I opened it, it already had all my music, videos, apps, books etc.
My old computer wasn't even set up to consolidate itunes files.
What I had done (earlier in the day)was use the "Windows easy tranfer" software to transfer all my old files and settings to the new computer via an external hard drive. itunes had found the files even though the Windows 7 location for music is a bit different from XP.
Bill Yovino (author) on June 26, 2011:
Thanks. I initially followed some instructions I found on YouTube, but they didn't work right (or I didn't follow them correctly). Then I tried what I've written here and it was much easier. In the process of writing this Hub, I performed the operation many times and now can do it very quickly. It's like many things in life, easier to do than to explain.
RTalloni on June 26, 2011:
Looks like clear instructions. Thanks for sharing. Am glad to have this as a resource.
How to Move Your Itunes Account to a New Computer
Source: https://turbofuture.com/computers/How-to-Move-your-iTunes-Library-to-a-new-PC-Windows
0 Response to "How to Move Your Itunes Account to a New Computer"
Post a Comment